vCenter 6.5 upgrade to 7.x
- Mar 29, 2022
- 2 min read
Updated: Apr 1, 2022
Upgrade requirements:
Review/Prep before ripping through these steps.
· Begin vSphere Upgrade
· Execute backups.
· Upgrade vCenter Server.
· Upgrade ESXi hosts.
· Upgrade virtual machines (VM Tools & HW)
· Upgrade complete.
vCenter upgrade guide
Steps:
· Navigate to the installation media ‘\vcsa-ui-installer\win32\installer.exe’ to initiate the process.
· Launch the installer and select the Upgrade option.

· Review the Introduction and click Next.

· Accept the EULA and click Next.

· Enter the source vCenter Server information and click the ‘Connect to Source’ button. Accept Certificate message.

· Provide the details for connecting to and authenticating with the source vCenter Server. Click Next and Accept the Certificate message.

· Enter the information for the deployment target. In this case I’m going directly to the ESXi host that manages my lab. Click Next.

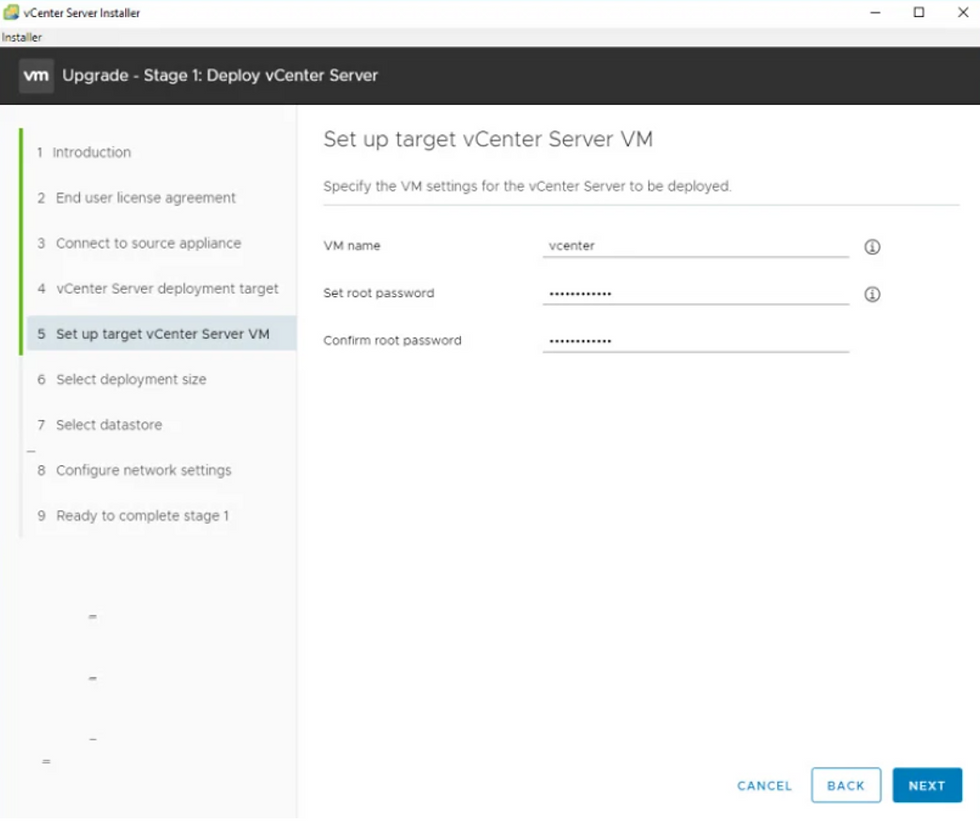
· Enter the name of the target vCenter Server VM and the root password.
NOTE: I appended the ‘_old’ suffix to the name of the vCenter Server source VM in the inventory. If I did not do this and attempted to use the same name I would receive an error message.

· Select the target deployment size. I’m using TINY for my lab environment, but you should choose the size that fits your requirements. Click Next.

· Select the datastore for the new vCenter Server VM (optional: enable thin disk mode). Click Next

· Enter the network settings for the new appliance. This is where you will enter the ‘temporary IP address’ for the new appliance during deployment. Click Next.

· Review the summary of Stage 1 and click Finish.

· The OVA deployment (Stage 1) will begin. Monitor the progress of the deployment.

· When Stage 1 completes you will see a ‘successful’ message. Review the information and click Continue when ready.

· Stage 2 will then begin. Click Next and a validation process will begin and provide you with Pre-upgrade check results. Click Close.


· Next you will select which data you want to import during the upgrade. The amount of data will be listed along with an estimated amount of time. Reference this LINK for some additional information as it will be important for you and your team to estimate the amount of time vCenter Server will be down (unavailable) during the process. Click Next.

· Accept the CEIP(optional) and click Next.

· Review the information in the Ready to Complete and click Finish. A Shutdown Warning message will appear. Click OK.


· The upgrade is then initiated.

· Monitor the progress of Stage 2. Data Copy from source to target will be Step 1 followed by setting up the target vCenter Server and starting services in Step 2.

· Setup of the target vCenter Server will begin and start services.

· Import copied data is Step 3. A message window will appear at the end of the process


· Stage 2 of the Upgrade Process completes. Click Close and your default web browser will launch.

· Click on the ‘Launch vSphere Client (HTML5)’ button and you’ll be redirected to the login page. Log into your vCenter Server using your credentials.

· Verify your vCenter Server is now running version 7.0. Done!


Comments